Overview
Revision control is a continuous process, with every change and edit tracked, allowing you to pick and choose each of these edits to create a new change.
Releases give the ability to point to a specific moment in the change history, without ambiguity.
This is especially important in hardware development as actual physical things must be fabricated and assembled. Unlike software in which updates can be easily loaded, once a physical object is rendered or shipped off into the field it has limited ability to change or update.
Releases help everyone working on the project know when files are ready for production. Although any number of commits can change the form, fit, or function of a product, the release process points to a set of files with the intended set of form, fit, or function changes.
The easiest way to understand releases is that a release points to a specific commit or design review with any number of attached files for download. The source code from that commit is also automatically included in a zip file.
Binary files
Another reason for using releases is that it is not always a good idea to track binary or rendered files. Revision control is often referred to as source control, where the source files are tracked with every change, but output files are not. This is because the binaries or readable output files change a lot between commits. The binary files are not human readable, and the readable output files aren’t necessarily important, relevant, or useful to check during each commit or Design Review.
When to track files between releases
Hardware development tends to have more types of output files that users may wish to keep track in commits. Some users might decide to only include gerber files in releases, whereas other teams might use every change in gerber files as part of a Continuous Integration, Continuous Deployment (CI/CD) process.
Your team might decide that Allspice’s schematic review tools are more than enough for revision tracking, and generate PDF schematics only for releases. Other teams might decide that each commit includes generated PDFs for more holistic snapshots. The tradeoff results in extra time downloading changes, extra time sorting through changes to review. Some teams may understand the performance hit to productivity, but have an extremely high need for quality. Some industries actually require these changes be tracked for compliance. In the end, it is a mix of business requirements and team preference.
Which files to track between releases
The hardware development process generates lots of different outputs, so no list is exhaustive. These are files that should definitely be in a release, but might not be tracked in the repo.
- Assembly information
- Upper level assembly repo
- Lower level assembly repos as folders, submodules, or subtrees
- Assembly instructions
- Cable harnesses
- Mounting hardware
- Enclosures
- Packaging
- Printed material
- User instructions
- Promotional materials
- Production firmware
- Upper level assembly repo
- Manufacturing information
- Gerbers
- Drill files
- Part position files (xy)
- Fabrication specifications
- Bills of Material (BOM)
- Reference designator location
- Cost of Goods Sold (COGS)
- Verification or validation
- Test procedures
- Test station
- Test software
- Test firmware
- Reference
- Schematics
- Data sheets
Releases versus Tags
The simplest difference between releases and tags is that releases allow you to attach files to the release and tags are just references to specific commits.
There is a lot of flexibility between using release versus tags. Some groups only use releases and ignore tags. Some users will generate releases only from tags. Some generate releases without a tag. It is likely that your team will use a mixture of some releases being created from a tag and others created without.
Tags can be used in many different ways, from capturing the branch name and feature development, or the design intent such as “TestNewRadioFrequencies”.
You may want to create a release with files, but signify that the files are not ready for production by using a pre-release. While pre-releases may be created from commits to the main branch, it is a bad idea to create releases from a development branch. Releases should only be created from the main branch.
Tags cannot be updated after they are created. Releases can be edited, more information given, and files can be added and deleted.
Release Workflow
This is the simplest release workflow:
- Create edits
- Commit changes
- Resolve conflicts
- Push changes
- Create Design Review
- Perform Design Review
- Update with requested changes
- Create edits
- Commit changes
- Resolve conflicts
- Push changes
- Approve Design Review
- Merge changes to main
- Update with requested changes
- Create tag (Optional)
- Create release from tag
- Attach files to release
- Distribute release Link
Revision naming conventions
- Software version convention is “vX.Y.Z” (i.e “v1.2.4”), but tags can include more descriptive references that show the intent of the tag. Some orgs may wish to retain this legacy style, however, some orgs may realize that users might not understand the difference between v3.1.2 and v3.1.3 and use a more human readable tag.
- Some organizations use “Rev/rev” instead of “v/ver/version”. It is often best to continue using whichever naming convention is already in use.
- Hardware often has integer rev numbers (i.e. 1,3, or 17) and skips minor revision numbers (1.1.0, 3.1.4, 17.0.7). For things like printed circuit boards, integer revisions can make sense. A pcb assembly, however might have minor revision numbers as some components might be removed or not installed, alternate parts used, white-wires added to change the schematic netlist, or other changes that happen after the circuit board is fabricated. Any naming convention can be used effectively as long as the team agrees on the format and usage.
How to create a hardware tag
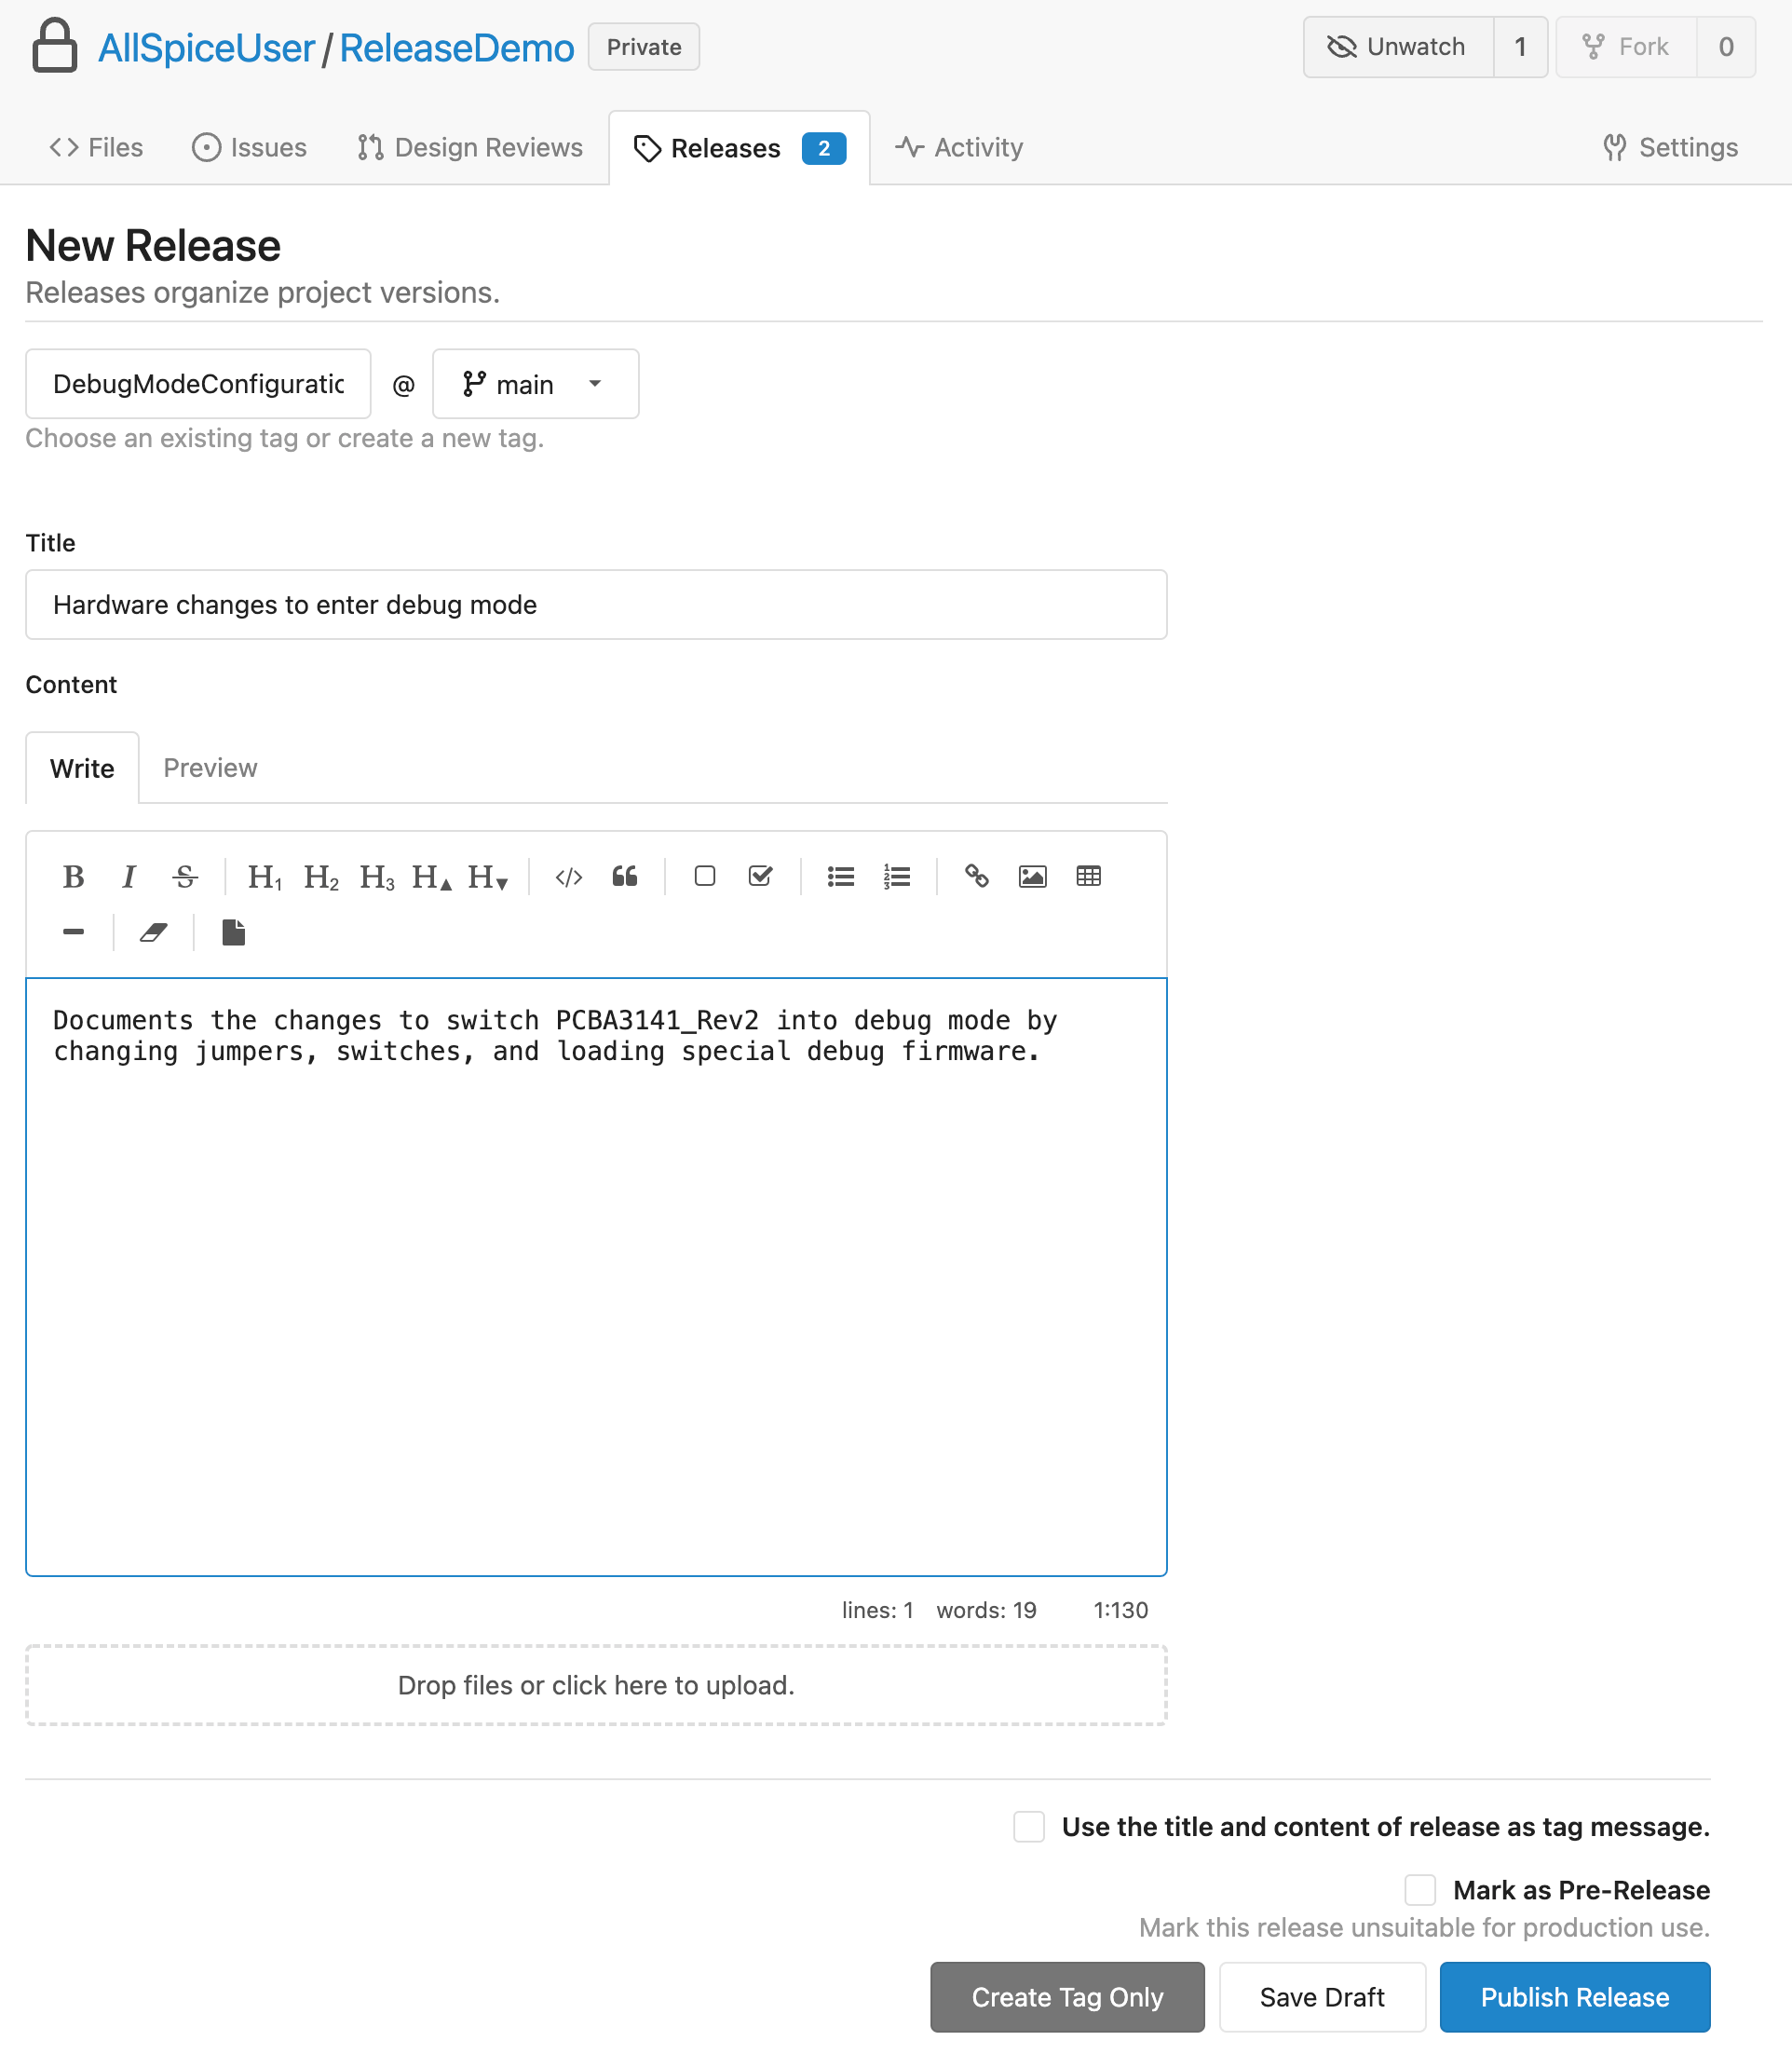
- Navigate to your repo and click on the releases tab.
- Click on the new New Release button.
hub.allspice.io/<organization>/<reponame>/releases/new
- Fill out the form.
- Enter the tag name, with no spaces.
- Select the branch.
- Enter a well described title.
- Enter information about the tag in the content.
- Do not attach files. Tags only include the source from the commits and do not include attached files.
- Select the “Create Tag Only” button.
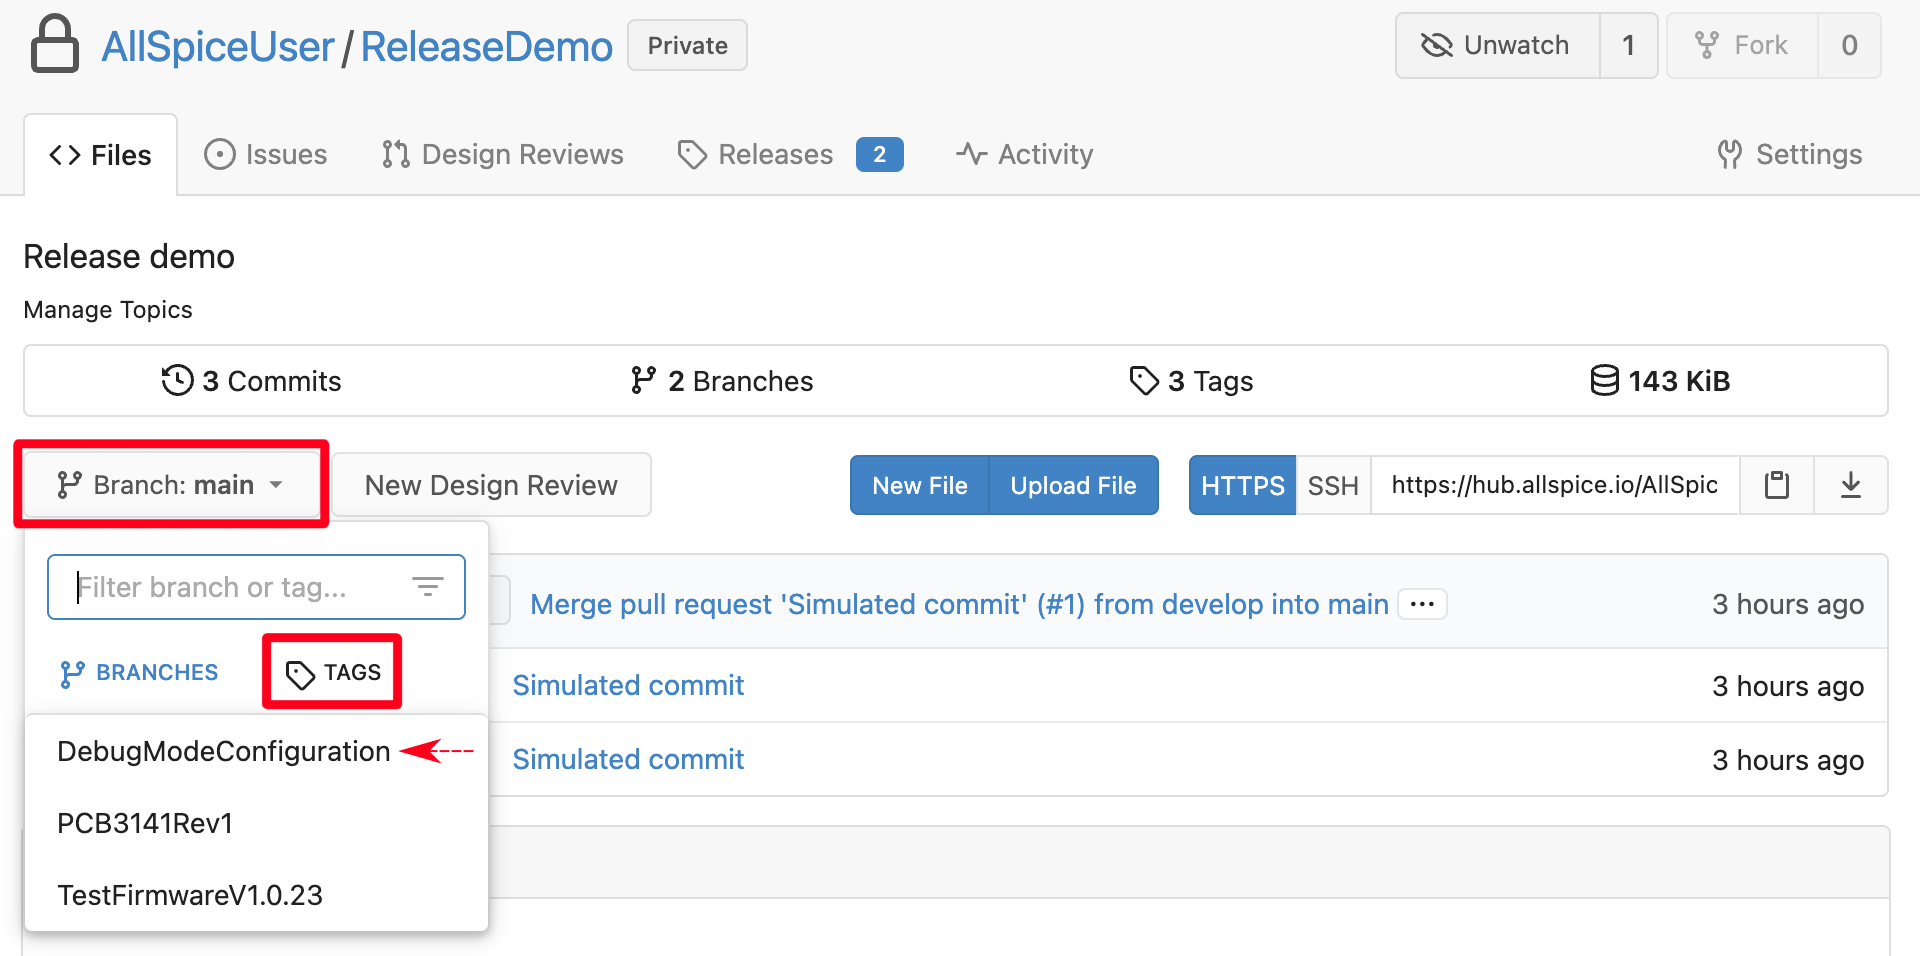
- You can view your tag from the main repo, by clicking on the branch / tag pulldown and selecting Tags and then selecting the individual tag by name.
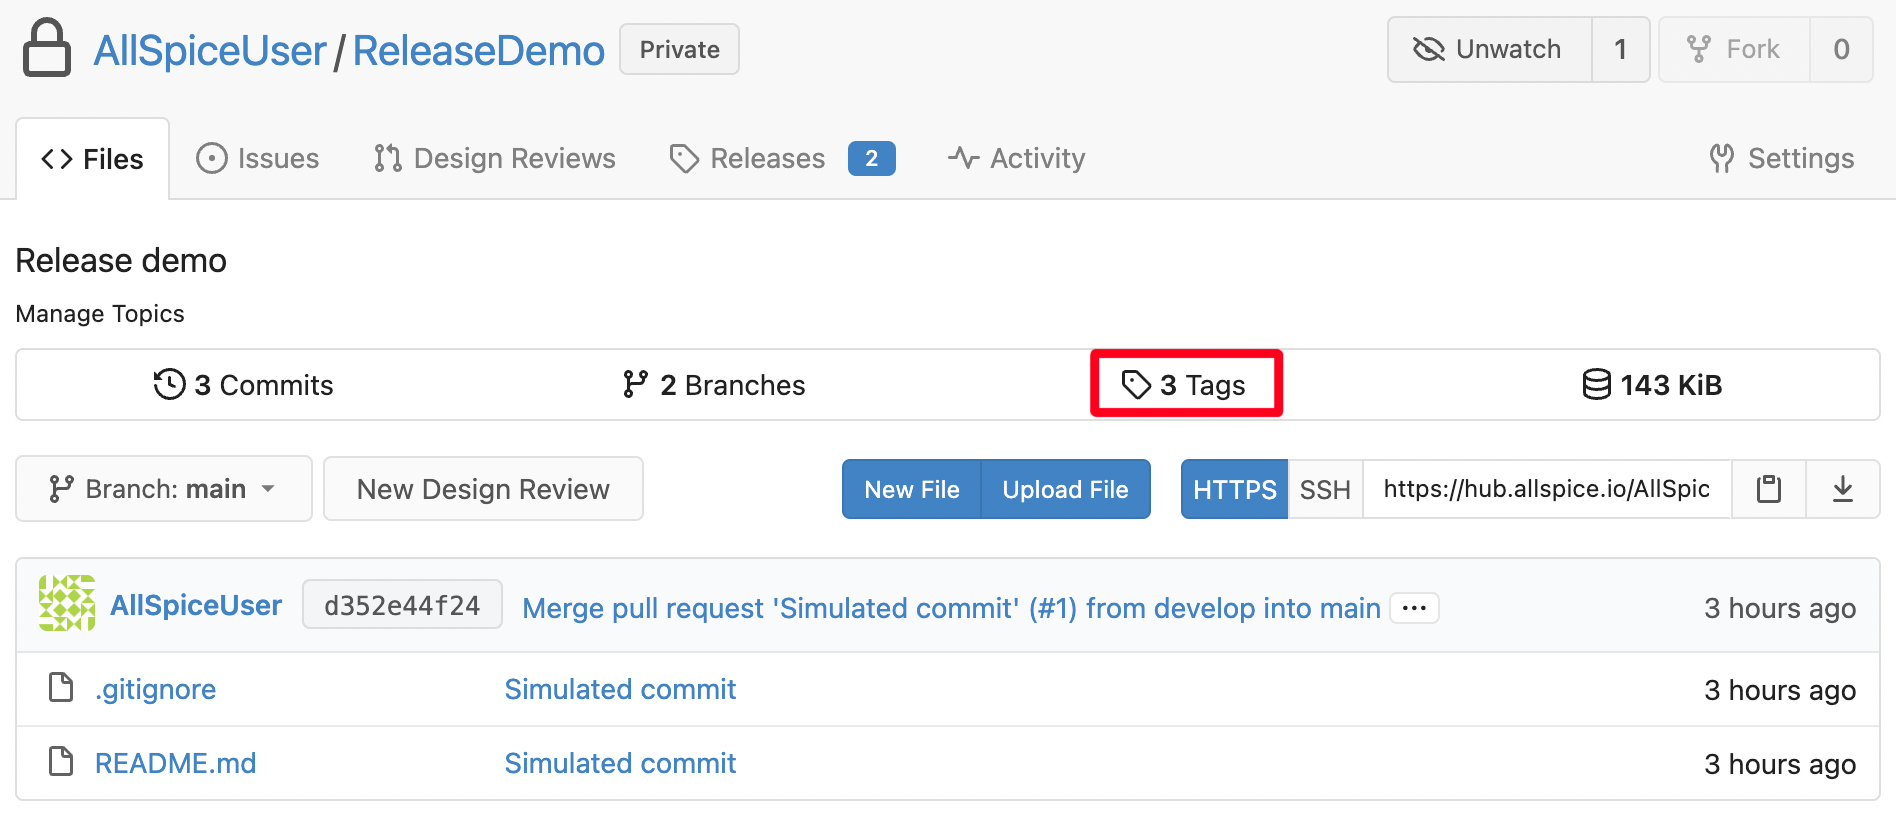
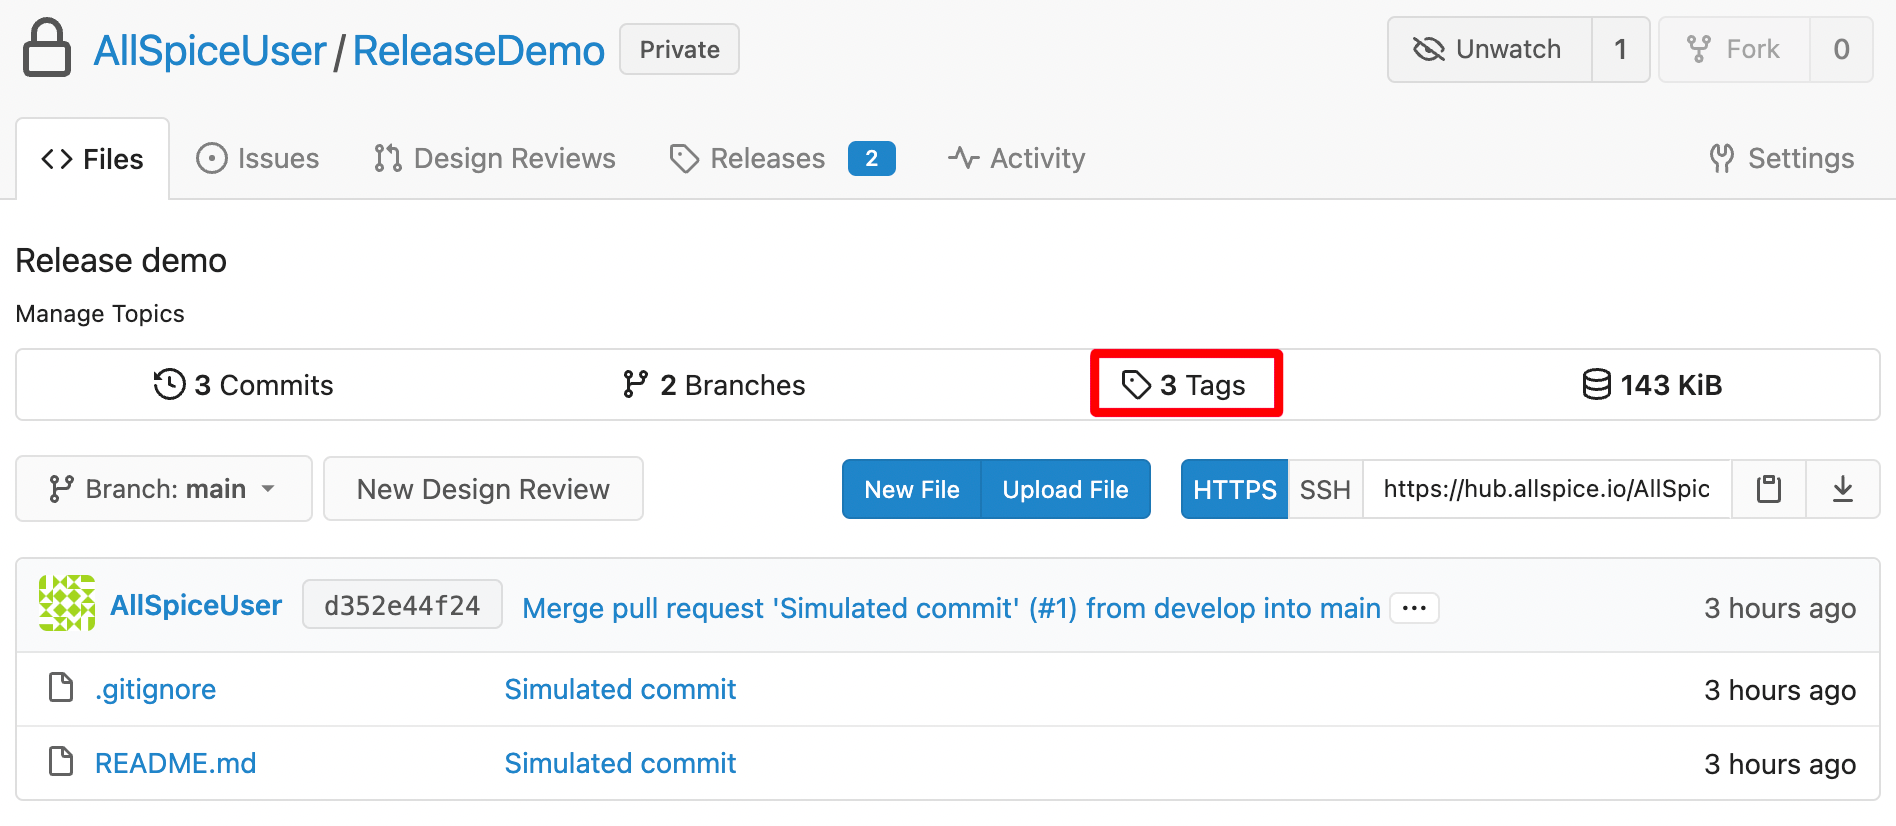
- You can also view your tag from the main repo, and clicking on the Tags tab:
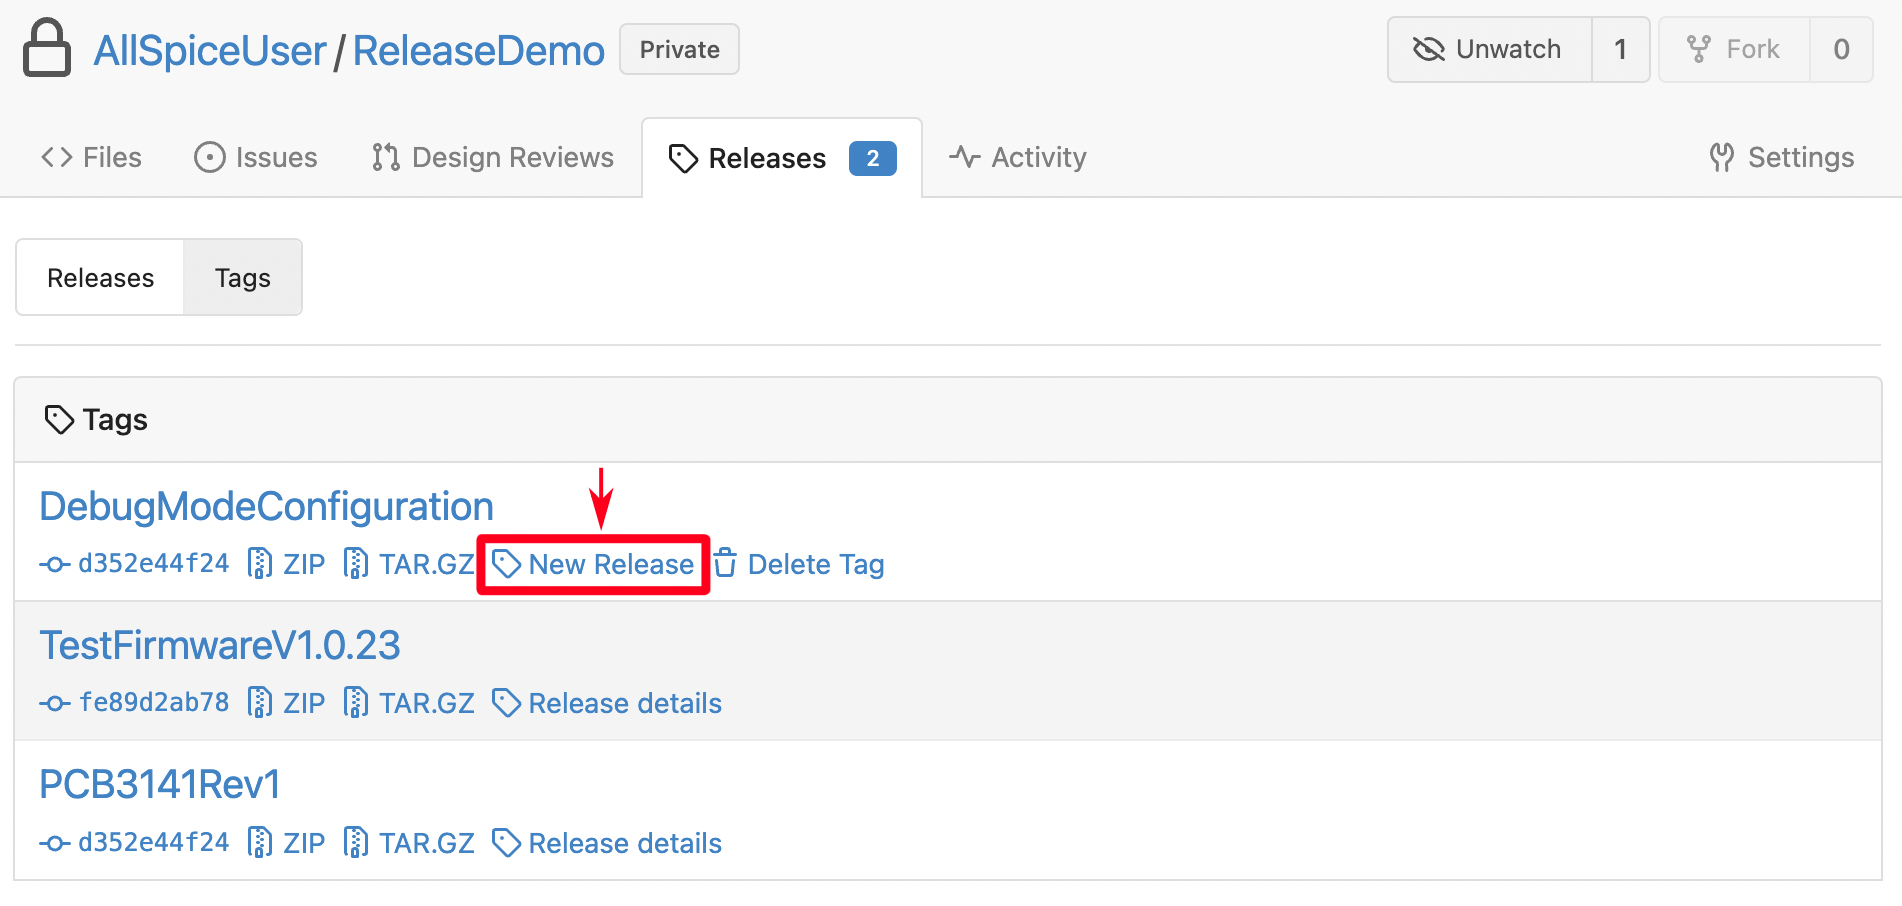
- This will take you to a list of all your tags:
https://hub.allspice.io/<organization>/<reponame>/tags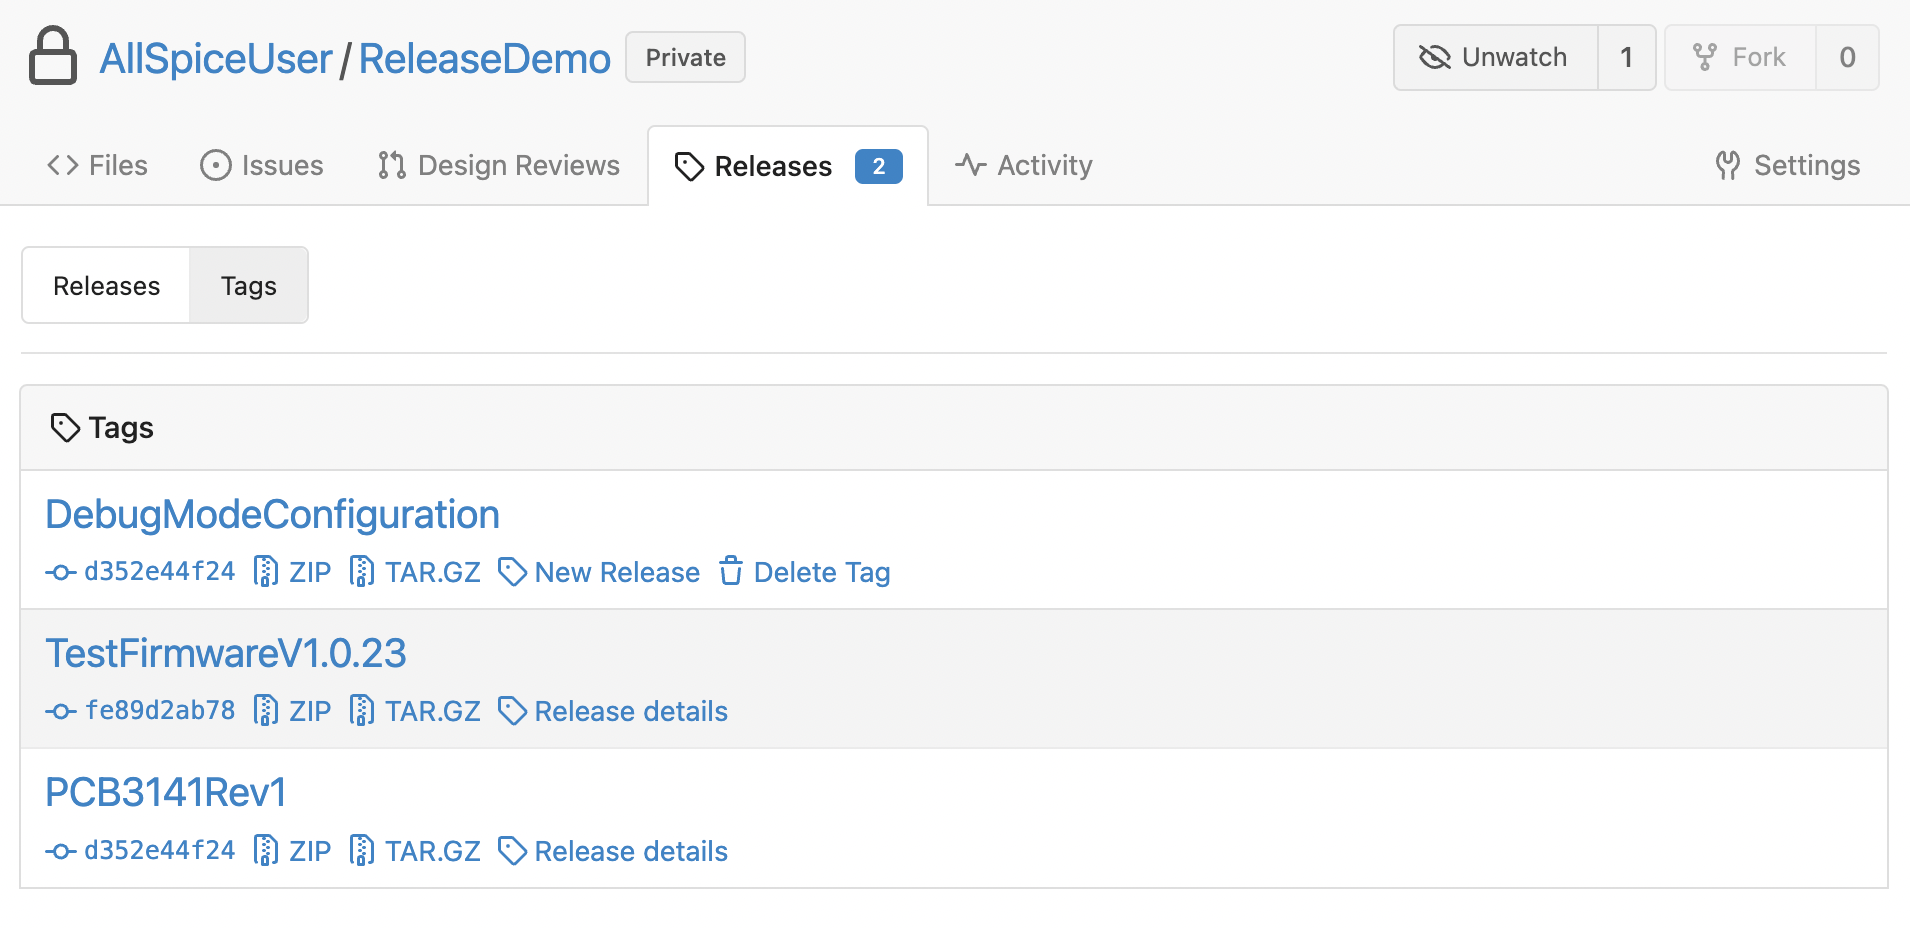
How to create a hardware release
- Generate and organize the files you want to go into a release.
- Manual generation is often useful in the early parts of a project, but it is best if scripts or automated processes are used to consistently generate the files, if possible.
- Keep these files in a folder/subfolders that are marked to not be tracked in the .gitignore file.
- For example if you have a folder “/release”, add the following to the .gitignore file.
release/*
- Create zip archives based on the target audience:
- PCBA Contract Manufacturer
- Upper level assembly
- Test Procedure
- It is a good idea to name your files so that when they are downloaded by others, it is clear which project generated the files.
- For example including the PCB# (PCB3141_v2.0_LTE) or company and project name (yourcompanyname_project_vX.Y.Z).
- Naming files with only the version number can lead to mistakes by your team or contract manufacturers. If a process is fully automated, version numbers are appropriate.
- Commit your changes, merge any conflicts, and push to a development or other non-main branch of the repo.
- Create and perform a Design Review and merge into main.
- Create Releases from tag:
- Click the Tags tab on the main repo:
- Click on "New Release" from the selected tag:
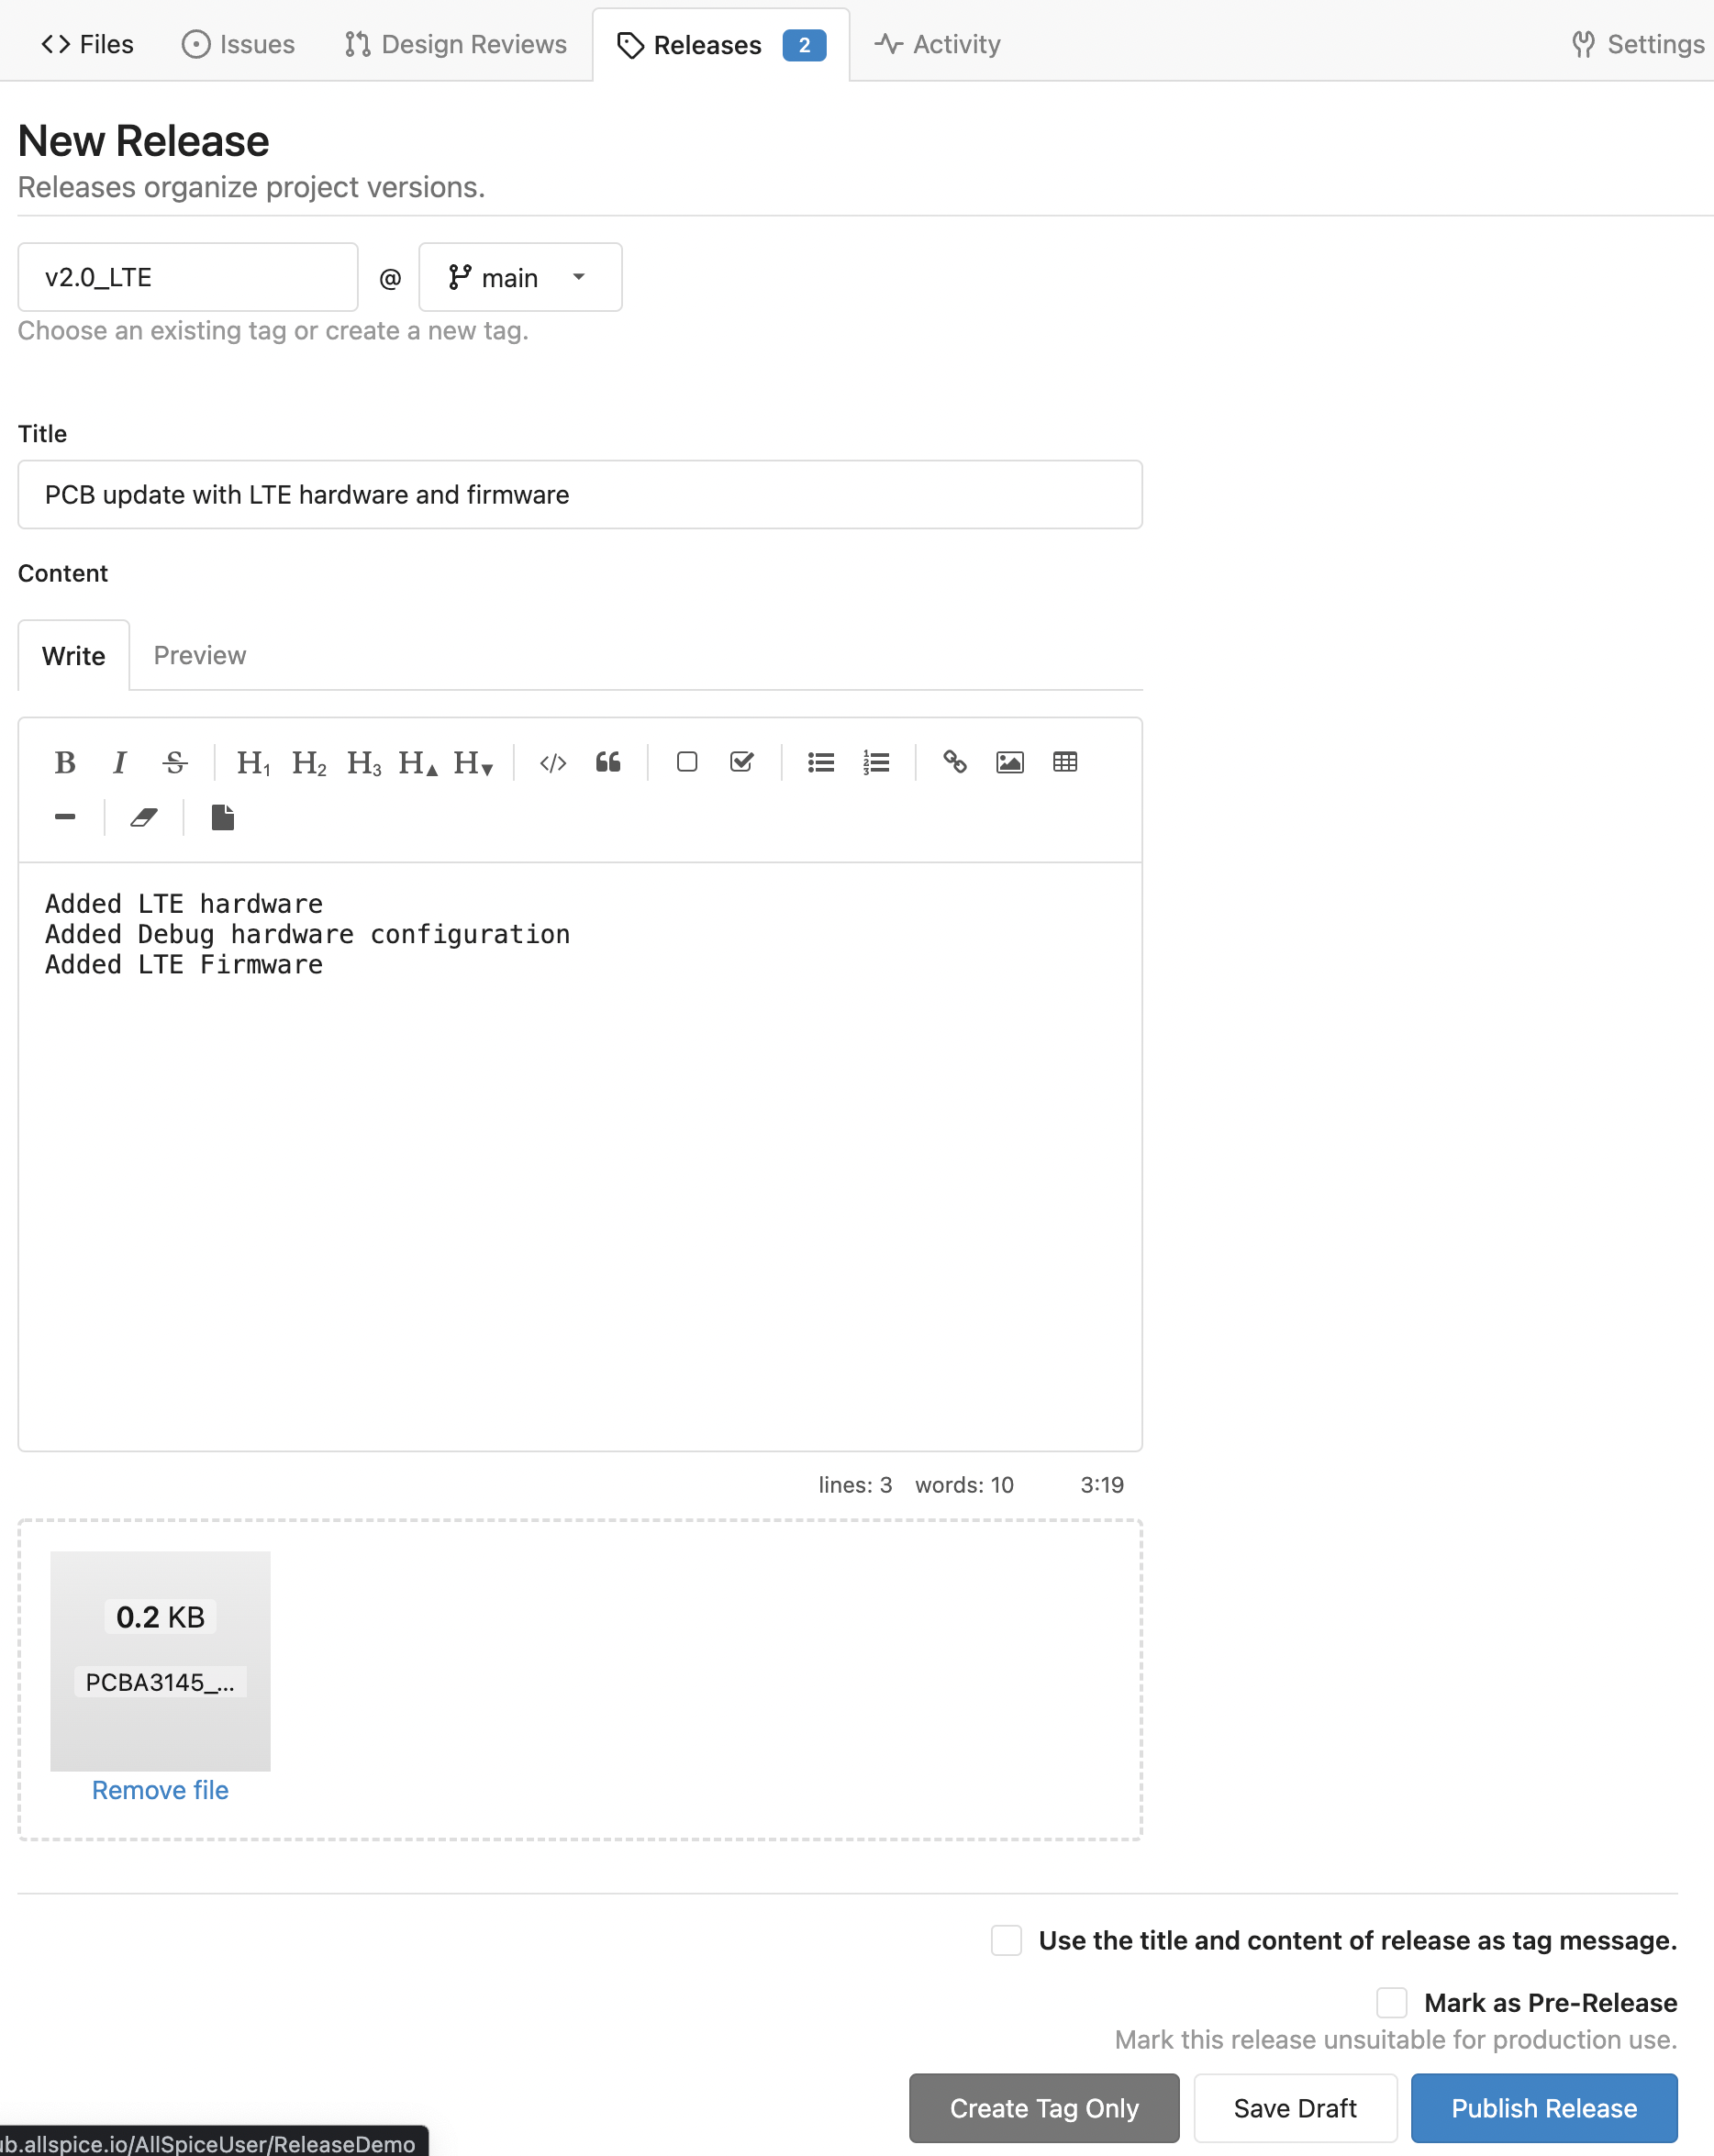
- Fill out the New Release form (below).
- Creating a release from scratch:
- Visit your target repo and click on the Releases tab.
- Click on the New Release button.
https://hub.allspice.io/<organization>/<reponame>/releases/new - Add a tag name with no spaces for the release.
- Select main branch if this is a release.
- Your team may opt to use development branches for pre-releases.
- Do not select a development branch for releases.
- Enter a well formatted title. This is how users will understand what is special about this release and differentiate it from other releases.
- Include relevant details about the project in the Content section. This information will show up in the result and helps people avoid having to dig through the changelog to see which releases are correct.
- Attach the release files. Now is usually a good time to review what you are attaching for correctness.
- Click on "Mark as Pre-Release" if you wish to circulate preliminary files for validation.
- Click on “Publish Release”.
- Visit the releases tab of your repo to see the release.
- It’s often a good idea to review the title and content text to ensure the release will make sense to others and to yourself in a week.
- It’s a good idea to review the attached files for correctness. Every release process is bumpy the first time through, and you may find that you have forgotten an important manufacturing file.
- It’s recommended to circulate the release link for a review process.
https://hub.allspice.io/<organization>/<repo>/releases/tag/<yourtag>
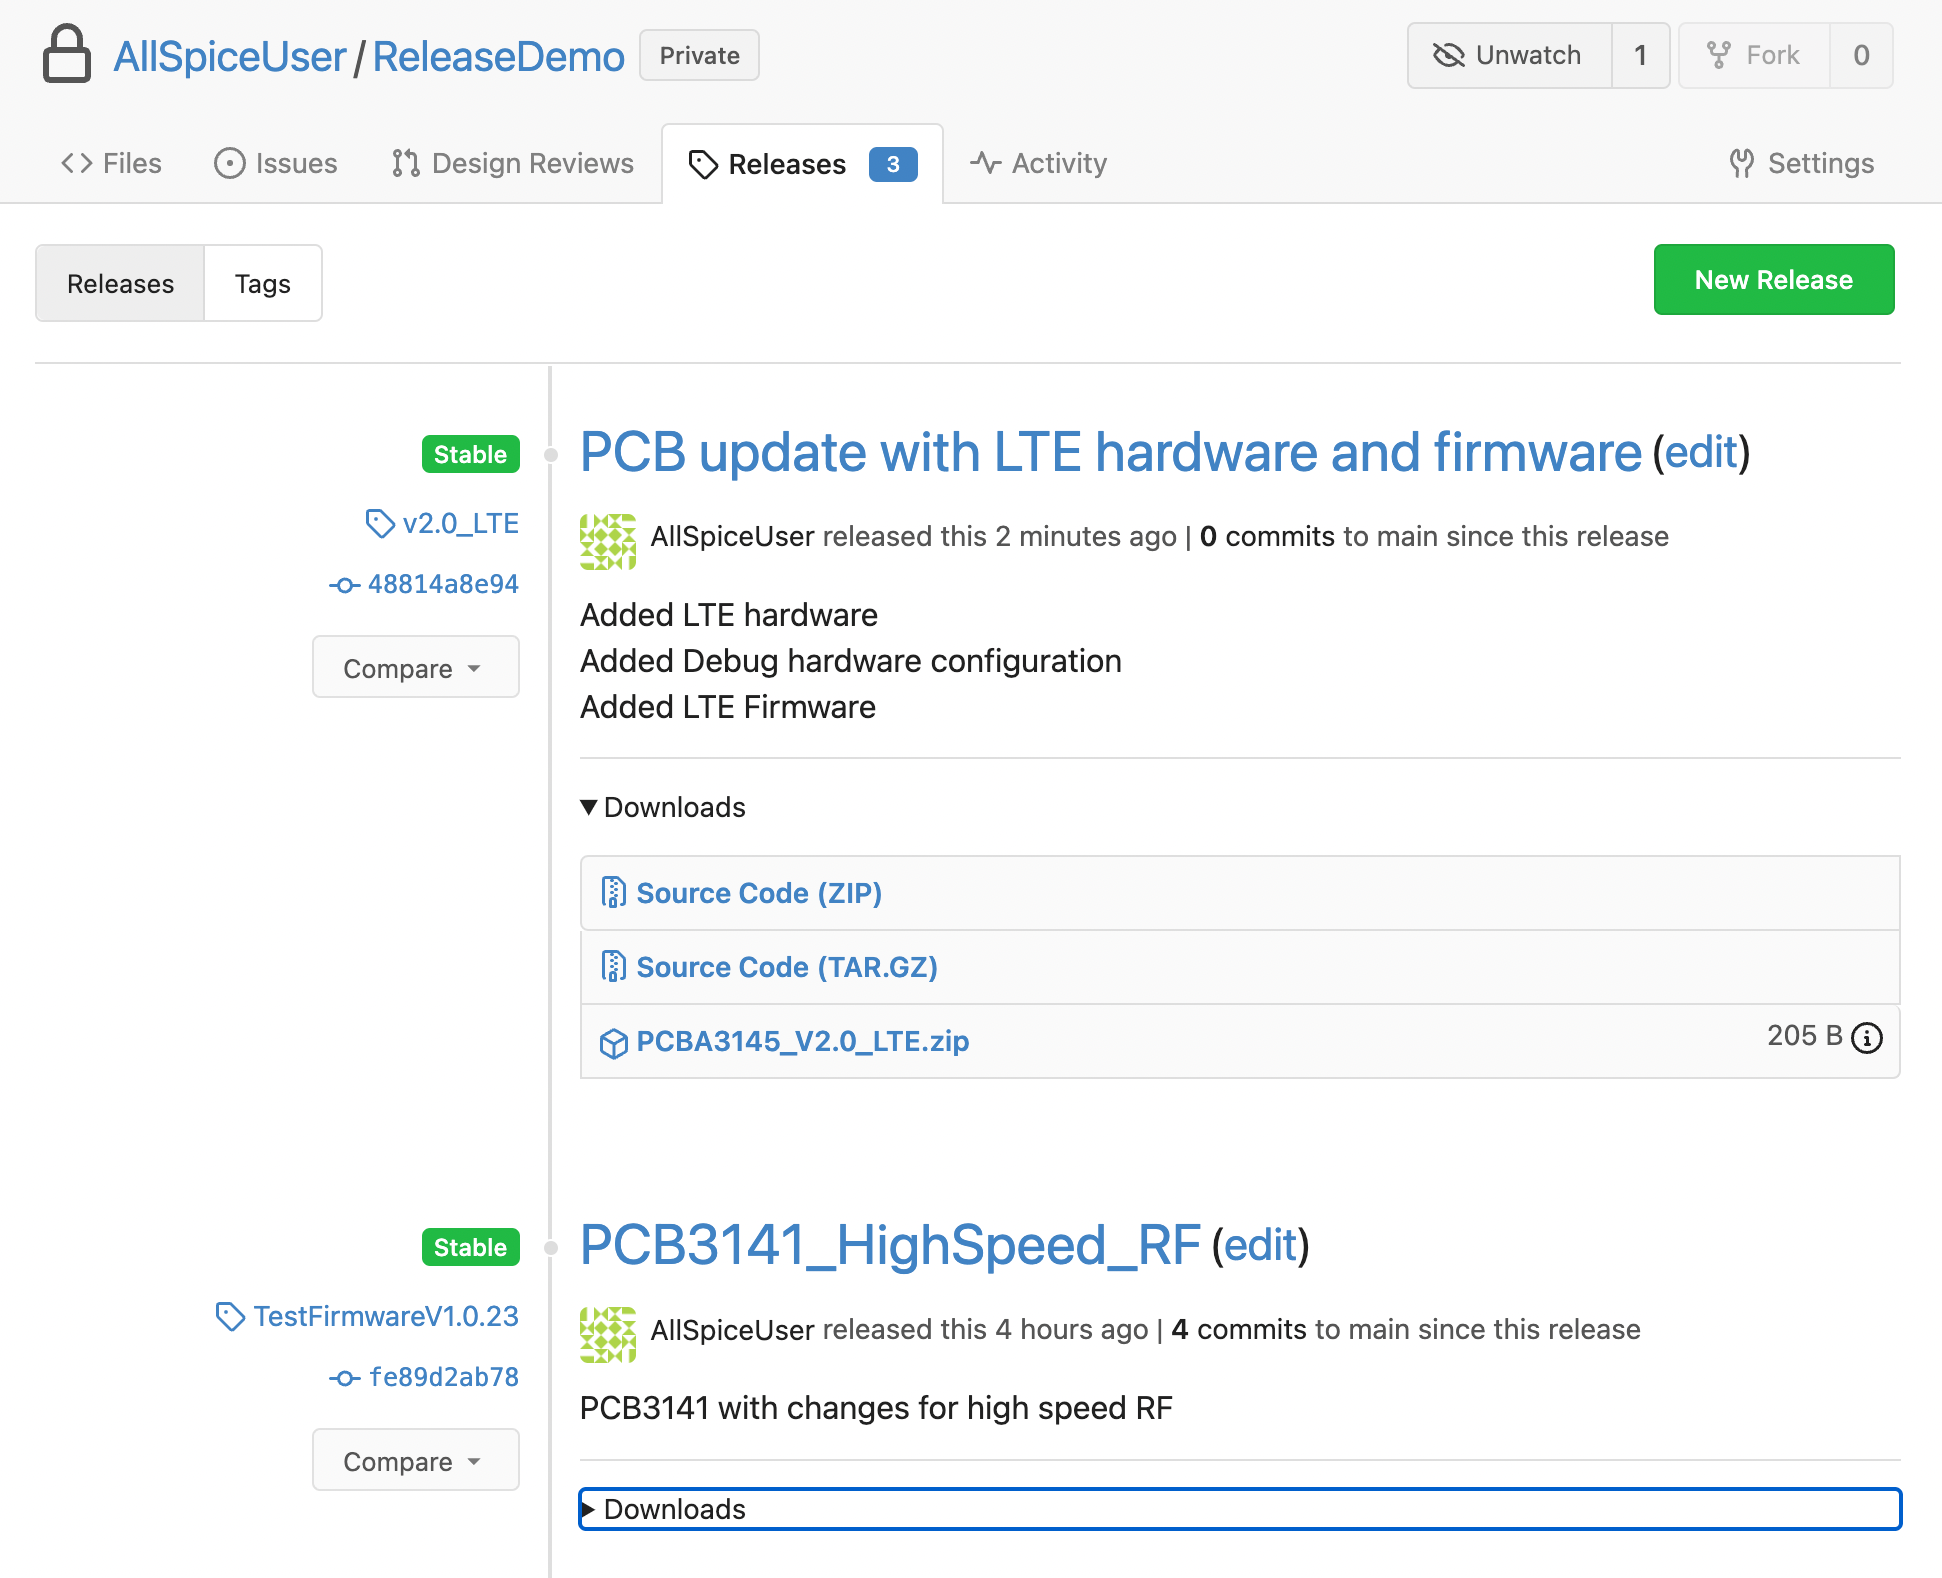
Congratulations, you’ve created a release and provided everyone with a clear set of files to fabricate, assemble, and use your product!